Enabling In-App Purchases and Cloud Saving for iOS
- by Gaida San

Enabling In-App Purchases
First of all, if we want to use IAPs in the game we need to enable that Capability for our App ID in the Apple Developer account (and download the updated provision again):

Second, we need to fill the Tax and Banking information on the App Store Connect. This is usually handled by the account owner.
Third, we need to add the actual IAPs in the App Store Connect.

Please find tutorials about adding new IAPs here:
https://help.apple.com/app-store-connect/#/devae49fb316
Please be aware that if you add a new or change the existing IAP on the App Store, you have to wait 5 to 15 minutes before the change will be visible to your game.
Next, we need to enable all these plugins:

If we have a C++ project, we need to add these lines to the Build.cs file:
if (Target.Platform == UnrealTargetPlatform.IOS)
{
   		 PrivateDependencyModuleNames.AddRange(new string[] { "Core", "CoreUObject", "Engine", "OnlineSubsystem" });
   		 DynamicallyLoadedModuleNames.AddRange(new string[] { "OnlineSubsystemIOS" });
}Then, we need to add an IOSEngine.ini config file under Config/IOS. In this file we have to enable the IAP support and disable the second version of the App Store API if we are not using it. In my case, the second version doesn’t work at all and I had to disable it completely to make the purchases work.
[OnlineSubsystemIOS.Store]
bSupportsInAppPurchasing=true
bUseStoreV2=false
After all of that, we can go to the BP graph and start using the IAPs functions. Just make sure to use version 1 of them (without the “V2” suffix) if you disabled the second version of the App Store API.

Pay to test
To test IAPs we need a Sandbox account. That account allows us to purchase items in the game without paying for them real money. But it could be quite interesting for Developers to pay for testing their app. 😉

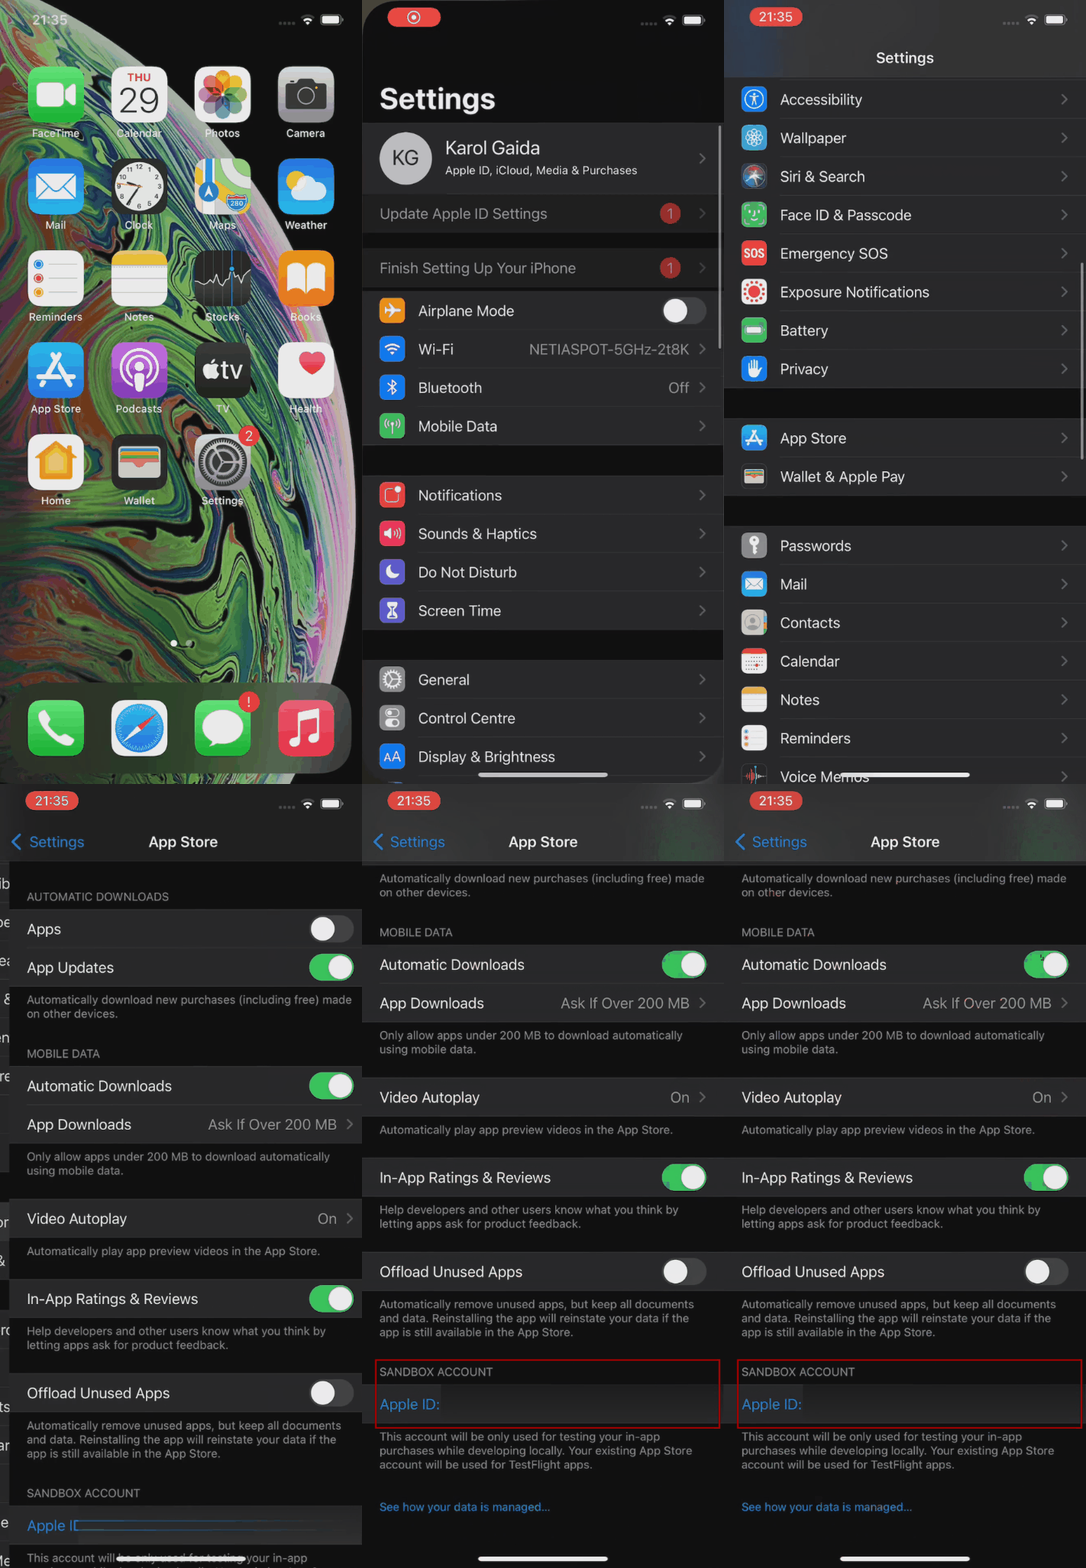
Even though the IPAs are connected to our game through the App Store, we can actually test them in the locally installed build. We just need to make sure we are logged into our App Store Sandbox account on the device.
More about testing with Sandbox can be found here:
Enabling Cloud Save
To enable cloud saving in our game first we need to enable iCloud support in the capabilities list for our App Id:

We also need to configure the iCloud container for our game. Clicking on the Configure button allows us to select the container from the list. A new container for our App Id should be automatically created.
Second, we need to enable Cloud Kit Support in the Project Settings -> iOS. We can also choose the synchronization strategy:
Never – basically disables the cloud synchronization, so that’s not what we want,
At game start only – downloads the cloud data only once, at the game startup,
Always – download the cloud data at the game startup and every time the SaveGame or LoadGame method is executed during the gameplay.

Then, we need to enable the Online Framework Plugin:

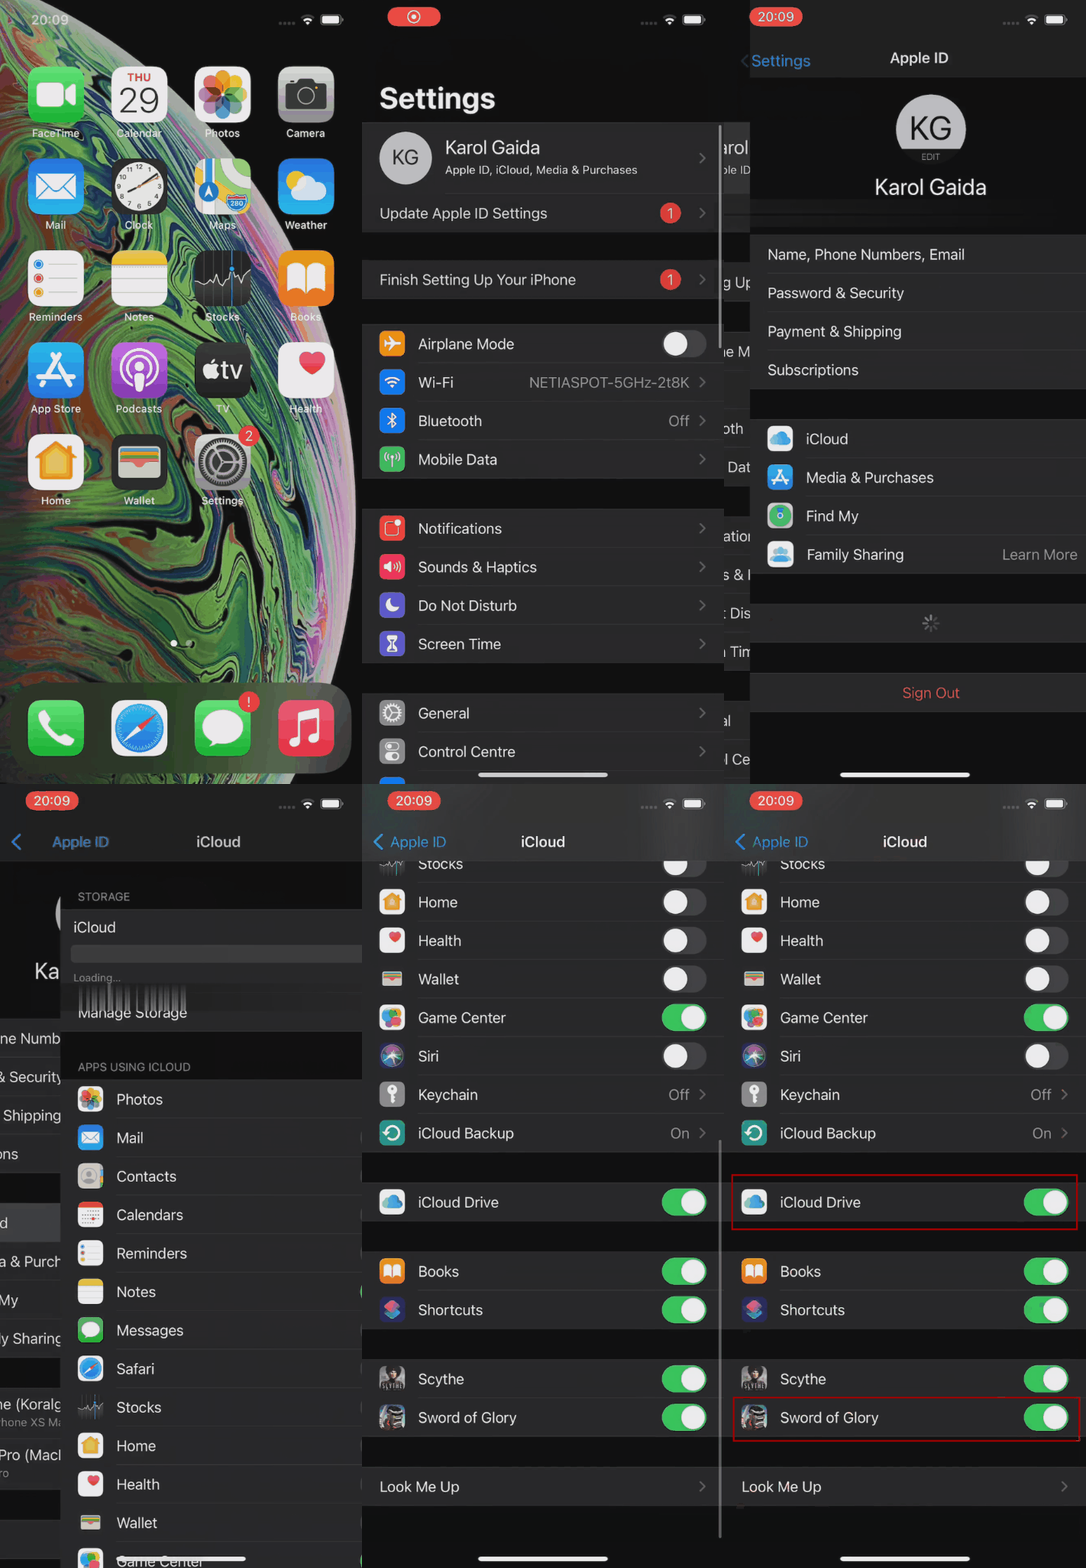
Lastly we need to make sure we are logged into our Apple account on the device and have the iCloud Drive enabled. We should have iCloud enabled for our game also:

At this point the cloud save should work properly. We can test that by playing our game until the save point, then reinstalling it, and launching again. We should be starting the game from the last saved checkpoint.
In case of cloud saving still doesn’t work after this setup, let’s see what happens in the iCloud dashboard.
In the Logs section Select the iCloud storage connected to our App Bundle Id -> Select Development environment -> Click Search Logs. If there are no logs here, then the game didn’t communicate with the cloud. That may be a setup issue so I recommend going through the setup process again.

If by any chance there is no iCloud storage for our App in the list, it may indicate an issue with the storage. I would go back to the Apple Developer portal and try to generate the storage again.
If the logs are here but the cloud save still doesn’t work, it may be due to the issue with access to the saved file. Let’s go to the Database -> Select the iCloud storage again -> Select Private Database -> And try to select “file” in the Record Type. If it doesn’t exist, iCloud probably can’t find the file in the database.

Here we could force the database to create a new record for the file. Click on the “plus” sign next to the “Records” -> Choose Private Database -> Choose type file -> And upload a sample Save Game file saved in the project directory.

Now we could try to query records again. We should see an item named “SaveSlot” there.
The last thing, if we want to test the cloud save through Test Flight, we need to Deploy Schema Changes to production. The green dot indicates successful deployment under the iCloud storage Id.
Lost progress when playing offline
There is a situation when we play the game offline, make some progress, and then switch the internet connection back on. Unreal synchronizes with the cloud at game startup causing the local save to be overridden by the cloud save. This leads to a loss of progress.
To solve this issue let’s implement a custom solution for resolving conflicting saves, which basically gives the Player an opportunity to choose which save he wants to load to the game.

I tried a few solutions that didn’t work so first let’s see what we cloud avoid.
My first approach was to dynamically disable the Cloud Kit Support. I wanted to stop the iCloud synchronization for a moment, load the local Save Game, then enable the synchronization again, and allow the game to download the Save Game from the cloud.

I implemented that by accessing the GConfig global variable and modifying the “bEnableCloudKitSupport”. This was a good try but in the end, it doesn’t work because the OnlineSubsystemIOS is initialized at the game startup and changing this variable makes no effect in runtime.
void UIOSConfigLibrary::SetICloudKitSupportEnabled(bool Enabled)
{
#if WITH_ENGINE
    GConfig->SetBool(TEXT("/Script/IOSRuntimeSettings.IOSRuntimeSettings"), TEXT("bEnableCloudKitSupport"), Enabled, GEngineIni);
#endif
}

bool UIOSConfigLibrary::IsICloudKitSupportEnabled()
{
    bool bEnableCloudKit{false};

#if WITH_ENGINE
    GConfig->GetBool(TEXT("/Script/IOSRuntimeSettings.IOSRuntimeSettings"), TEXT("bEnableCloudKitSupport"), bEnableCloudKit, GEngineIni);
#endif

    return bEnableCloudKit;
}So the next thing I thought about was – what if I change the variable in the config and then reinitialize the Online Subsystem? I tried to do that and unfortunately, it resulted in a crash in the VoiceInterface::Tick(). I guess it’s tightly connected to the Online Subsystem. I tried to disable all plugins related to voice, but it didn’t solve the problem.
void UIOSConfigLibrary::ReinitOnlineSubsystemIOS(UObject* WorldContextObject)
{
    UWorld* World = GEngine->GetWorldFromContextObject(WorldContextObject, EGetWorldErrorMode::LogAndReturnNull);
    auto OnlineSubsystem = Online::GetSubsystem(World);

    UE_LOG(LogTemp, Log, TEXT("UIOSConfigLibrary::ReinitOnlineSubsystemIOS: World = %s, OnlineSubsystem = %s"),
   	 (World ? TEXT("true") : TEXT("false")), (OnlineSubsystem ? TEXT("true") : TEXT("false")));

    if(OnlineSubsystem)
    {
   	 OnlineSubsystem->Shutdown();
   	 OnlineSubsystem->Init();
    }
}After that, I started digging into the OnlineSubsystemIOS to find out how cloud synchronization works. The classes I looked into were:
- FOnlineSubsystemIOS which performs the Subsystem initialization
- FOnlineUserCloudInterfaceIOS which defines the actual interface between Unreal Engine and iCloud. We can find a lot of Objective-C code there.
- FIOSSaveGameSystem which overrides the default SaveGameSystem functions provided by Unreal to load and save the game. We could go from here all the way up to the UGameplayStatics class which defines the AsyncLoadGameFromSlot() and AsyncSaveGameToSlot() that we use in BP.
When saving, Unreal first sends data to iCloud and then writes it to the local file:
bool FIOSSaveGameSystem::SaveGameNoCloud(bool bAttemptToUseUI, const TCHAR* Name, const int32 UserIndex, const TArray<uint8>& Data)
{
    return FFileHelper::SaveArrayToFile(Data, *GetSaveGamePath(Name));
}

bool FIOSSaveGameSystem::SaveGame(bool bAttemptToUseUI, const TCHAR* Name, const int32 UserIndex, const TArray<uint8>& Data)
{
    // send to the iCloud, if enabled
    OnWriteUserCloudFileBeginDelegate.ExecuteIfBound(FString(Name), Data);

    return FFileHelper::SaveArrayToFile(Data, *GetSaveGamePath(Name));
}Let’s modify the Engine code to add our own function for saving the game on the device only. We just copy the other function and remove the call to the delegate.
With that, we can distinguish between the local and cloud save by saving to two different slots. We use the first one for local saves only. So now we have 2 parallel saves and one of them is never synchronized with the cloud directly.

Finally, we add a timestamp to the Save object to compare local save vs cloud save. When the timestamps in both saves don’t match, we know the saves are not in sync. We can let the Player choose which one he wants to load.
Team leader with more than 8 years of professional experience as a programmer.

